How to Properly Split Jerk

*This post will pertain only to the receiving position of the Split jerk not the jerk drive.

Which foot leads?

First makes sure that you understand the correct foot position. If you’re un sure about which foot should lead forward try 3 reps of a walking lunge. The foot that led is going to be your forward foot.

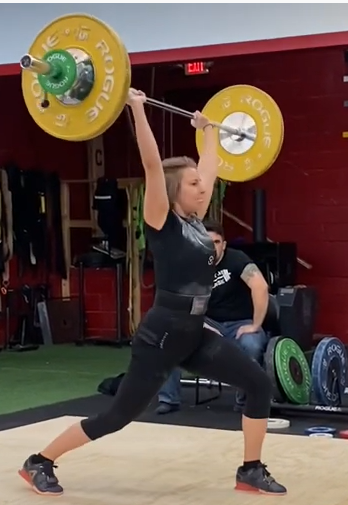
Split Jerk Stance – Picture this as a ¼ lunge stance. BACK LEG - The back knee should be at least under the hip if not a but bit further back. You are on the ball of the back foot with the heel turned outwards. This will close the hip and provide hip stability. FRONT LEG – The front knee should above the front ankle. The front foot should be flat on the ground with the toe pointing in. this will close the hip and provide more stability. WIDTH – The width of the legs will depend on your frame size and the amount of balance you need. The narrow the stance the less base of support. We are aiming for feet planted about shoulder width.

Split Jerk Foot Position Drill – With the hand on the hips, set back foot back. Placing a good amount of weight on the foot ensure you’re on the ball of the foot with the heel out then reaching the front foot forward make contact with the floor. Make sure to balance the weight evenly 50% front 50% back before you recover. Recover by stepping the front foot back and then the back foot forward

Tall Split Jerk Timing Drill (Bar Top of the Head) – Place the bar on the top of the head. Plant the back foot. After you initiate the reach forward with the front leg lock out the elbows before you contact the ground with the front foot. Take a moment to ensure proper back and front foot positions and proper weight distribution before you recover. Do not unlock the arms until you are standing tall.

Tall Split Jerk Timing Drill (bar in the jerk rack position) -   Keeping the bar in the jerk rack position, step the back foot back, initiate the step forward locking out the elbows before the front foot hits the ground. Trying to make a louder sound with the front foot allows more time to secure the bar overhead before the foot contacts the ground. Be patient before trying the lock out the arms and make sure the front foot is in the air before locking out.

Tall Split Jerk Fast Timing Drill (bar in the jerk rack position) - Starting the jerk rack position, move both feet simultaneously. Ensure the timing of the feet and the elbows back foot hits the ground first, elbows lock out second and then front foot.

Think of it as…

1. Plant (back foot),

2. Elbows (securing the bar overhead) and

3. Stomp (front foot).


Words of advice – Getting the correct balance positions requires understanding of what “balance feels like” to create the most stable position. It also requires the ability to dynamically get into that position. Always use the recovery position to reinforce proper balance. Meaning check all your boxes before you stand tall and start your next rep. We are trying to drive this into your subconscious. We do that through conscious intention.

Last note: In real life the elbows will not lock out before the front foot hits first. But being proactive about correct foot timing and and securing the bar overhead will allow for you to start absorbing the weight before the bar starts its downward descend. Elbows locking out before the ground hits is an over correction cue.

How to Warm up the Jerk

Use this warm up progression to pattern and prime the Jerk 

Each movement should be done for 5 reps each


Overhead press - Put the bar into the front rack position, shrug the shoulders up, grasp the bar. 

Press the bar up and back, aiming for your forehead, return to the start position by pointing the elbows forward. Try to get the bar back in the jerk rack position each time. (use this to build the jerk rack position and proper bar path)

Push press - Start in a secure Jerk rack position by grasping the bar and shrugging the shoulders up, Break at the knees, driving them out and keeping the weight over the front of the heels. Elbows and bar do not move as your torso travels downwards. At the bottom position explosively extend the hips and knees guiding the bar up and back as if you were doing a strict press. (use this to help pattern the proper dip drive, focusing on keeping the weight balanced and vertical bar path)

Tall jerk - Start with the bar on the top of the head. As simultaneously as possible, move both feet. In this order  make sure the back foot hits the ground first, elbow lock out and then the front foot hits the ground last. Confirm you are balanced before you recover. Recover by stepping the front foot back then the back foot forward. (use this to help build speed under the bar, foot/elbow timing and balance)


1 Push Press + 1 Jerk - Start with the bar in a secure jerk rack position. Execute one push press then one jerk. Note that the jerk is simply a push press with a press under the bar, The Push press is what accelerates the bar up off the shoulders to a height that will resemble the tall jerk. At that point you are to press the hips under the bar and secure it to the body by locking out the elbows before the hips stop traveling. (use this to blend the dip and the press under. Keep thinking of the 1st part of the jerk as a push press).

The Jerk can be complicated due to balance and coordination. Go slow with this and identify which part of the warm you are struggling with the most and you may want to really hone in and clear that movement pattern first. You can also train all 4 movements separately as their exercises and progress them slowly. One other addition would be pauses in the bottom of the dip and pauses in the lock out. Add those so you can adjust your weight if balance is an issue.